Model Types
Understand the different model architectures in SLEAP-NN.
Overview
| Model Type | Animals | Occlusion | Training | Use Case |
|---|---|---|---|---|
| Single Instance | 1 | N/A | 1 model | Isolated animals |
| Top-Down | Many | Some | 2 models | Multiple non-overlapping and animal sizes are smaller compared to the whole image |
| Bottom-Up | Many | Heavy | 1 model | Crowded scenes |
| Multi-Class | Many | Varies | 1-2 models | Known identities |
Choosing a Model
Ask yourself these questions, in order. The first one that matches your data points to a model — follow the link for setup details. Answer based on your entire project, not just a typical frame: if even some frames have more than one animal, treat it as a multi-animal problem.
1. Only one animal per frame? It comes down to how big the animal is relative to the frame:
- It usually fills more than ~50% of the frame → Single Instance
- It's usually small but sometimes fills the frame (e.g., it walks up to the camera) → Single Instance — there's no benefit to cropping once the animal is already large
- It's consistently small (well under half the frame, in every frame) → Top-Down — the centroid stage finds the animal, then crops in for precise keypoints
2. Multiple animals — do you need to keep persistent identities? (a label like "male"/"female" that stays attached to the same individual across frames)
- No → skip to question 3, then add tracking afterward to link instances across frames.
- Yes, and the individuals are visually distinct (markers, fur color, ear-clips) → Multi-Class — it predicts identity directly, no separate tracking step. Pick its top-down or bottom-up variant using question 3 below, then follow the Supervised ID guide.
- Yes, but they look too similar to learn apart → use a standard pose model (question 3) plus tracking.
3. Multiple animals, just need their poses?
- They're separated / rarely overlap → Top-Down (usually the most accurate option)
- They overlap or touch often and have flexible, deformable bodies (long limbs, worms) → Bottom-Up
- They overlap but are rigid / compact → Top-Down still works well
When in doubt, try both
Top-down and bottom-up trade off differently across datasets. If you're on the fence, train both and compare metrics on your validation set.
Quick Guidelines
| Scenario | Recommendation |
|---|---|
| Single fly in chamber, fills the frame | Single Instance |
| Single mouse, small in a large arena | Top-Down |
| 2-3 mice in separate areas | Top-Down |
| Social behavior, animals touching | Bottom-Up |
| Worms / long flexible bodies that cross | Bottom-Up |
| Visually distinct individuals to keep labeled | Multi-Class |
| Similar-looking individuals to keep separate | Standard pose model + tracking |
Single Instance
One animal per frame.
When to Use
- Single animal videos
- No need for tracking
- Fastest training and inference
Configuration
Inference
Top-Down
Two-stage: detect centers, then estimate pose.
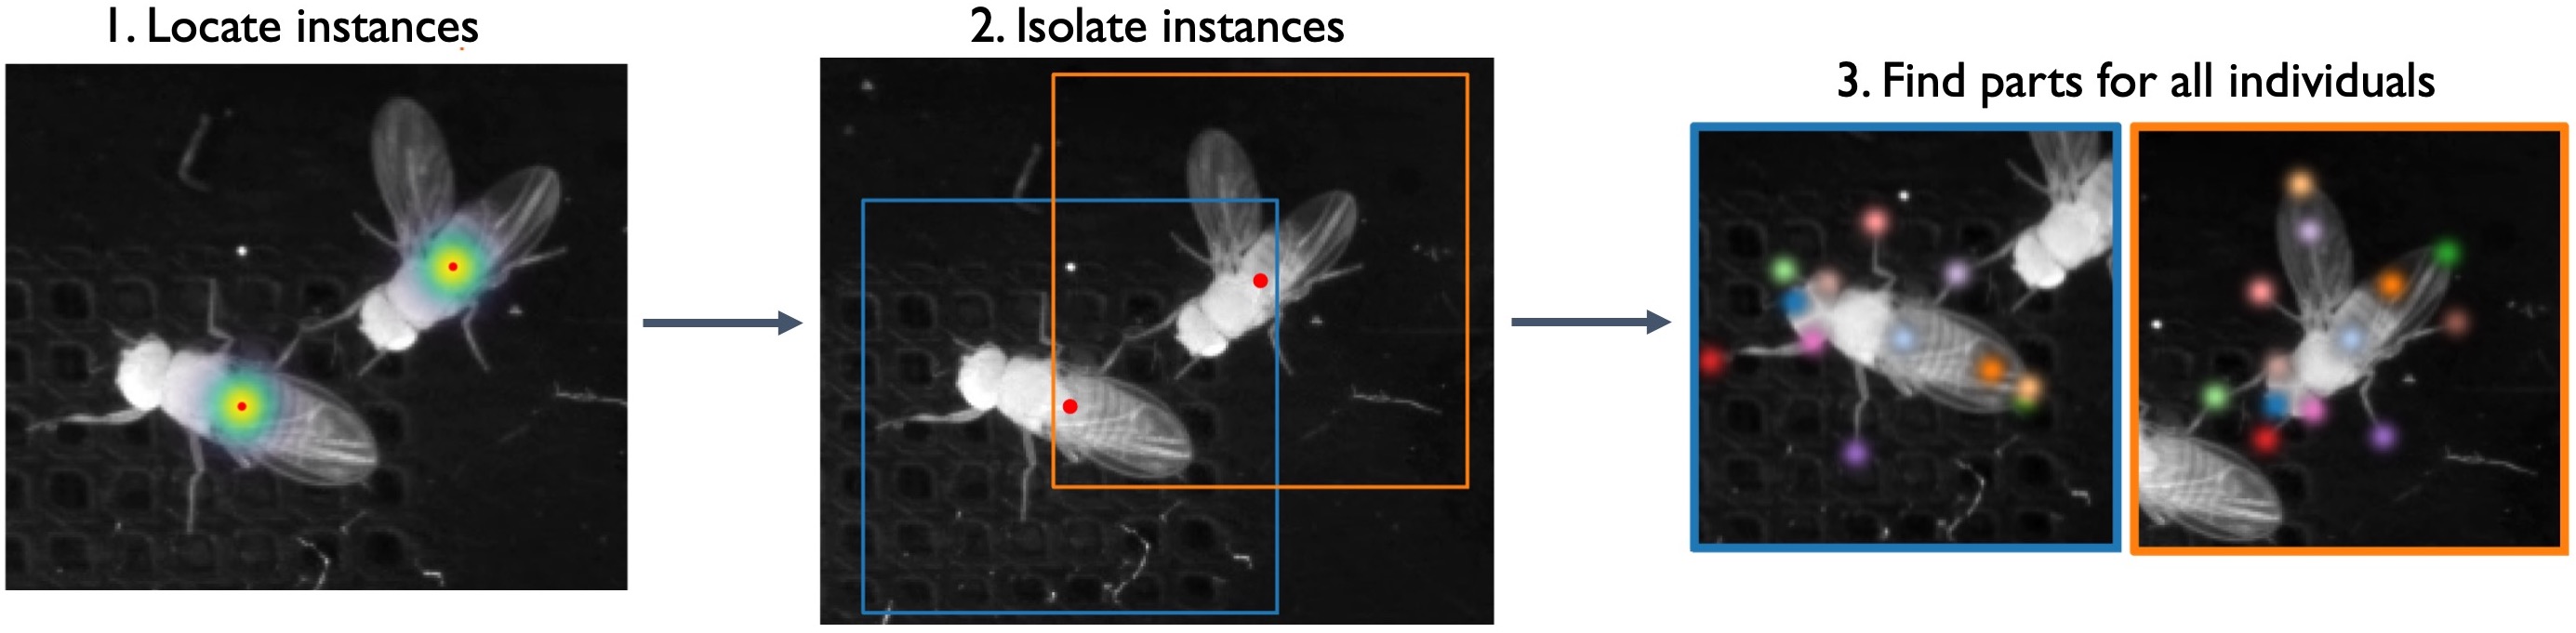
Stage 1: Image → Backbone → Centroid Map → Instance Centers
Stage 2: Crop → Backbone → Confidence Maps → Keypoints
When to Use
- Multiple animals that are clearly separated
- Animals vary in size (centroid crops normalize scale)
- Need precise localization per individual
Need persistent identities?
If your animals have distinct, consistent appearances, use the
multi_class_topdown variant to predict identity alongside pose — see the
Supervised ID guide.
Centroid Model Tips
Sigma for centroid detection
Increasing sigma makes centroid confidence maps coarser—easier to detect animals but less precise. This is often a good trade-off for the centroid stage.
Use a specific anchor part
Choosing a specific node as the centroid (e.g., thorax) leads to more consistent results than using the bounding box center, which often falls on different parts of the animal. This matters because the centered instance model depends on consistent positioning within the crop.
Reduce resolution for centroid model
Since centroids can be detected coarsely, you can reduce input image resolution (preprocessing.scale) to save computation. This is especially useful early in labeling when training data is limited.
Crop size
Set crop size large enough to include the whole animal in the centered instance crops.
Configuration
Centroid model:
Instance model:
head_configs:
  centered_instance:
    confmaps:
      anchor_part: null
      sigma: 5.0

data_config:
  preprocessing:
    crop_size: 256
Training
Train two models separately:
Inference
Bottom-Up
Detect all keypoints, then group into instances.
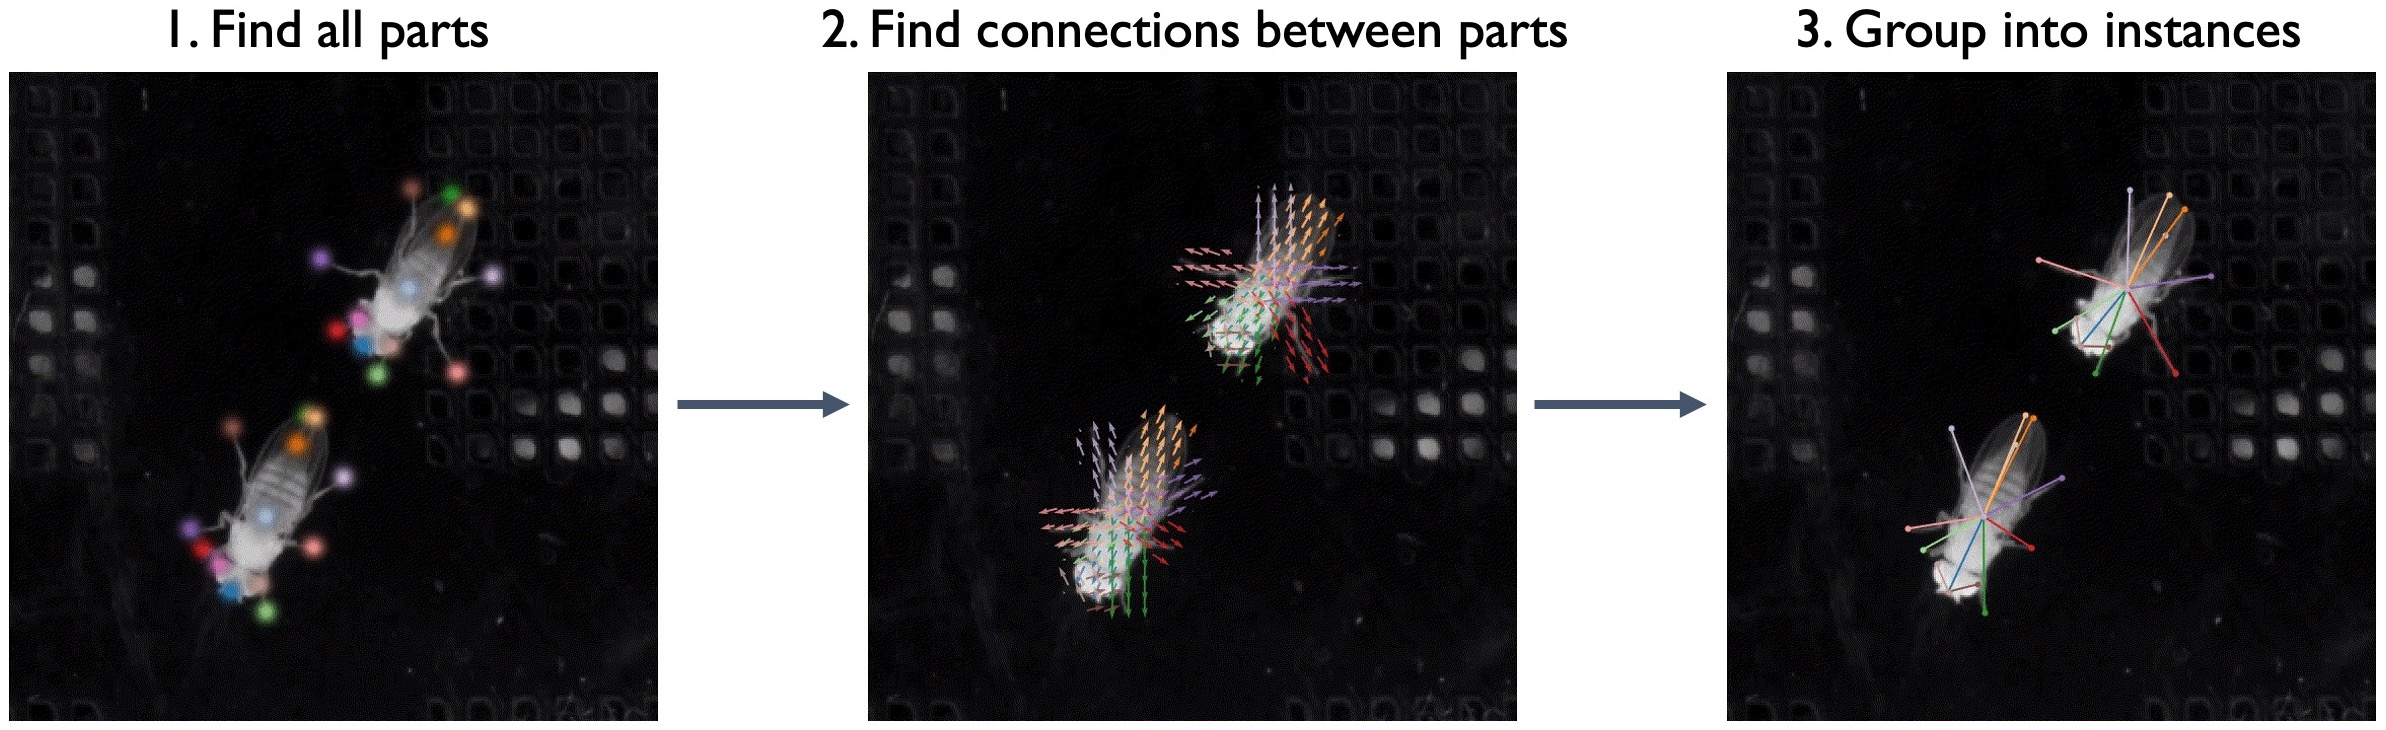
When to Use
- Animals frequently occlude each other
- Many animals in frame (more efficient than top-down)
- Animals touching/interacting
- Uniform animal sizes
Need persistent identities?
If your animals have distinct, consistent appearances, use the
multi_class_bottomup variant to predict identity alongside pose — see the
Supervised ID guide.
Try both approaches
Top-down works better for some datasets while bottom-up works better for others. To maximize accuracy, try both and compare results.
How It Works
- Confidence maps: Locate all keypoints of all animals
- Part Affinity Fields (PAFs): Encode connections between keypoints
- Grouping: Hungarian matching to assemble instances
Configuration
head_configs:
  bottomup:
    confmaps:
      sigma: 2.5
      output_stride: 4
      loss_weight: 1.0
    pafs:
      sigma: 75.0
      output_stride: 8
      loss_weight: 1.0
Inference
Multi-Class (Identity Models)
Pose estimation + supervised identity prediction.
Use when you have labeled identity/track information in training data. For the full workflow — labeling identities, choosing a variant, tuning, and inference — see the Supervised ID guide.
Multi-Class Bottom-Up
head_configs:
  multi_class_bottomup:
    confmaps:
      sigma: 5.0
      loss_weight: 1.0
    class_maps:
      classes: null  # Infer from track names
      sigma: 5.0
      loss_weight: 1.0
Multi-Class Top-Down
head_configs:
  multi_class_topdown:
    confmaps:
      sigma: 5.0
      loss_weight: 1.0
    class_vectors:
      classes: null
      num_fc_layers: 1
      num_fc_units: 64
      loss_weight: 1.0
Backbones
UNet
- Most flexible
- Works at any resolution
- Configurable depth/width
ConvNeXt
- Modern CNN architecture
- ImageNet pretrained weights
- Good for transfer learning
Swin Transformer
- Vision transformer
- Best for global context
- Highest memory usage
Performance Comparison
Approximate training times on RTX 3090 (1000 labeled frames):
| Model | Training Time | Inference Speed |
|---|---|---|
| Single Instance | ~30 min | ~500 FPS |
| Top-Down | ~1 hr (2 models) | ~100 FPS |
| Bottom-Up | ~1 hr | ~80 FPS |
Training Options
Key hyperparameters to configure when training models.
Batch Size
Number of examples per training step.
| Setting | Effect |
|---|---|
| Higher | Better generalization, requires more GPU memory |
| Lower | May overfit, useful when few varied examples |
Tip: Reduce batch size if you run out of GPU memory.
Receptive Field
Controls how much context the model sees around each pixel. Determined by max stride and input scaling.
| Parameter | Description |
|---|---|
max_stride |
Larger stride = larger receptive field, but more parameters |
input_scale |
Downsampling increases receptive field relative to original size |
Rule of thumb: Receptive field should be approximately as large as your animal.
For top-down models:
- Centroid model: Use larger receptive field (more downsampling OK)
- Centered instance model: Smaller receptive field to preserve details
Augmentation
Data augmentation helps train more robust models.
| Type | Recommended Settings |
|---|---|
| Rotation | Side view: -15° to 15°, Top view: -180° to 180° |
| Brightness/Contrast | Enable if test videos have different lighting |
| Scale | Small variations (0.9-1.1) for size robustness |
Online Hard Keypoint Mining (OHKM)
Enable for skeletons with many joints. Makes "hard" joints contribute more to the loss, improving accuracy on difficult keypoints.
See Shrivastava et al., 2016 for details.
Tips
Start simple
Try Single Instance or Top-Down first. Only use Bottom-Up if needed.
More data helps Bottom-Up
PAF learning benefits from diverse poses and interactions.
Anchor part for Top-Down
Set anchor_part to a reliable body part (e.g., "thorax") for better cropping.